Optimisation Tips
It is important that the image you choose to upload is optimised to the maximum for use on the web. It is extremely important to make the image file as small as acceptable quality will permit, since smaller images dramatically decrease download time when internet users access pages with images. We will offer some tips on how to optimise an image using PhotoShop, However there are many other ways and programs that can be used to get the same result or even better.
- Change the image resolution
- Most of the monitors display images at 72 pixels per inch. Higher image resolution may be lost on the computer screen
-
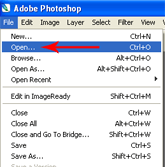
- Open your image in Photoshop by choosing File >> Open from the menu bar, locating your file, and clicking the Open button.
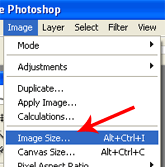
- Select Image from top menu, select Image Size
- Make sure that the Constrain Proportions and Resample Image check boxes are checked in the Image Size dialog box
- In the Print Size section, there is a Resolution numerical field. Make sure that pixels/inch is selected in the pull-down menu to its right
- If the number in this field is larger than 72, change it to 72
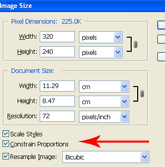
- Click OK
- Save it by choosing File >> Save from the menu bar
Reduce the physical size of the image
- Reducing the physical size of image will dramatically reduce the file size. We need to reduce your image size to 162 pixels in width and 100 pixels in height.
-
- Open your image in Photoshop by choosing File >> Open from the menu bar, locating your file, and clicking the Open button.
- Select Image from top menu, select Image Size
- Make sure that the Constrain Proportions and Resample Image check boxes are checked in the Image Size dialog box
- Under the Pixel Dimensions you will see numerical fields for Width and Height. If the largest value is the Width, replace it with the number 162. If the largest value is the Height replace it with the number 100
- Click OK
- You may need to crop the image to shave off a bit from the sides to make it exactly 162 pixels in width and 100 pixels in height.
- If the image looks fine, save it by choosing File >> Save As from the menu bar and save it as a JPEG
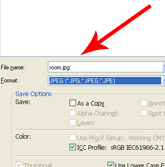
- Click Save, select Image Option Quality Low and Format Progressive
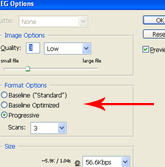
- Click OK
Use PhotoShop's optimising tool
- This is the best way to get a well optimised file size
-
- Open your image in Photoshop by choosing File >> Open from the menu bar, locating your file, and clicking the Open button.
- Select Image from top menu, select Image Size
- Make sure that the Constrain Proportions and Resample Image check boxes are checked in the Image Size dialog box
- Under the Pixel Dimensions you will see numerical fields for Width and Height. If the largest value is the Width, replace it with the number 162. If the largest value is the Height replace it with the number 100
- Click OK
- You may need to crop the image to shave off a bit from the sides to make it exactly 162 pixels in width and 100 pixels in height.
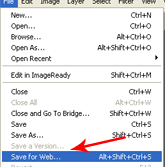
- Now select File >> Save for Web
- Make sure that the Preset is set to JPEG Low, Optimized is ticked and Progressive is unticked. This should give you a file size of 10KB or less
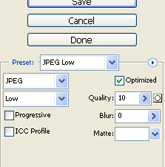
- Click Save
Contact us today! or register your child with us.